Description
Checkout Field Editor for WooCommerce
WooCommerce Checkout Field Editor is specifically developed to organize the smooth checkout experience. It’s a plugin that allows users to add up to 20 different types of custom checkout fields in sections that include Billing, Shipping, and Additional fields. A user gets an opportunity to add, modify, and remove fields with ease of use. With a single click, you may validate and customize checkout fields without technical knowledge.
Using this checkout field editor plugin, you get a chance to customize the account details of your customers as required in WooCommerce plugins. The choice is yours whether you consider free and premium features, both are ideal for customisation and facilitate users. Let’s look at the critical points of the WooCommerce checkout manager.
Premium Version | Demo | Documentation
FREE VERSION FIELDS
If you want to add any field using the free version during checkout customization, you may come across amazing fields that include text, number, password, email, phone, textarea, select, multi-select and radio, etc.
PREMIUM VERSION FIELDS
Premium version fields come with more custom options and premium plugins that reduce the bounce rate of a website and make users feel comfortable with stunning custom fields that include time picker, date picker, file upload, custom text, heading, hidden and checkbox group, etc.
KEY FEATURES
If you are curious about the WooCommerce checkout field editor and want to know how it works, you must be familiar with the key features of WooCommerce customization. Let’s take a look at the key features given below!
CUSTOMIZE CHECKOUT FIELDS
Customization is not a tricky job when it comes to WooCommerce checkout manager, you just need to focus on additional fields on your checkout page and make sure you are familiar with the art of using WooCommerce plugins. No doubt, you’re about to add 20 checkout fields to your checkout page to make users informed about the customization process.
CUSTOMIZE FIELDS ON ALL IMPORTANT SECTIONS
Are you looking for the advanced functionality of checkout field editors to add and update fields without any complication? Try our WooCommerce checkout editor plugin to ease your process. With the help of this plugin, you may easily update and add fields in the billing, shipping, and additional sections.
CUSTOMIZE MULTIPLE FIELD TYPES
After you have gone through customized fields on all important sections, the job isn’t over yet. WooCommerce checkout field editor also helps to customize multiple field types. Let’s overview some top-notch checkout fields!
-
TEXT
Text field seems to be the most common addition that users desire to consider while using online stores. If you want to enhance your shopping experience to grab the potential audience, you may add a text field for customers so that they may leave positive feedback about the shopping experience. Using this custom field, they get an opportunity to add any string of words or ask questions to the seller to bring improvement. -
EMAIL
Email is quite an essential field that users would never like to miss. Every user wants to add an email to get the newsletter and daily updates. So, there is no chance to skip the email field to get in touch with new users who want to build long-term relations with the sellers. On the other hand, you being a seller always want to get in touch with users, so always include this email field to improve the customization experience. -
PASSWORD
Password is also the most significant part that attracts users who want to stay on your online store for a long time. Therefore, you have no chance to ignore the password field, as you often ask your customers to enter the password and fill out the form to enhance the shopping experience. It is why, the ‘password field’ is a must so that you make your customers trust your services. -
PHONE
If you are a smart seller and want to track your buyers, nothing can work other than using a phone number. Hence, you have an opportunity to add a phone field to develop lasting relationships with your users. No doubt, customers like to add their contact details specifically phone numbers, so that you may contact them with ease and there is no way to skip this field while using the WooCommerce checkout field editor. -
TEXTAREA
If you want to know more details from customers regarding your product, you can add a textarea field to get in touch with the reviews, suggestions, and comments of your users with no character limits. Your valued customers may provide detailed information in textual form, so consider this WooCommerce field editor crucial for buyers. -
SELECT
To provide more options to your customers, you can add the field of ‘Select’ to seek more input from them regarding your products or services. Hence, they can select an option from the drop-down menu to meet their requirements and it’s a useful checkout field editor that improves customer engagement. -
RADIO
‘Radio button field’ is a stunning WooCommerce checkout manager plugin for users who specifically want to choose one particular option from multiple choices. The purpose is to get user input according to their needs and requirements. Therefore, they click on one option out of several to move forward. -
FILE UPLOAD
To improve security checks, you often ask for user identity proof and like to view their document files. However, to make it happen you always facilitate your customers with an option of the ‘File Upload’ field. In this particular addition, your users can provide you with identity proof by uploading files and other evidential information as required. -
MULTI-SELECT
Multi-Select is another editor field that comes with several options at the same time. This field is for customers who don’t feel satisfied with one single option. Hence, they prefer to choose as many options to meet their requirements. -
TIME PICKER
‘Time Picker field’ offers great benefits to users who want to pick time value and format. It’s an interesting option for customers who want to collect useful information from the site and you have no point in ignoring these types of WooCommerce checkout field editors. -
Date Picker
Buyers who are concerned about delivery always prefer to use this date picker field. Using this custom editor field, you may pick dates of your choice including day, month, and year with no confusion at all. It shows that the date picker field is useful for buyers. -
CHECKBOX GROUP
If you have multiple product lines and you want your customers to choose a group of items from different options, you may add a ‘checkbox group field’ for users so that they may pick different options at the same time from the available checkboxes. -
CUSTOM TEXT
Custom text is also a cool feature that comes in handy for many users especially those who want to add custom text to specify their purchase. The purpose is to leave suggestions and comments with the help of this custom text field that matters to buyers. Hence, a buyer may include this checkout editor to get feedback. -
HEADING
The option of heading is phenomenal for buyers. If you want more clarity around purchases from your buyers, you must include a heading field to grab the interest of your audience. With this, they get an opportunity to explain more about the items they want to explore. It helps them with a better online experience and you have to admit the beauty of this WooCommerce checkout manager. -
NUMBER
‘Number field’ also works great for users who are serious about using custom fields especially when it comes to staying on the platform for a smooth online experience. Hence, you must facilitate your users with the choice of adding phone numbers to strengthen security matters. -
HIDDEN
‘Hidden field’ is another important checkout field editor that you create for users. The purpose is to hide the field and features from customers so that they won’t see it. It remains hidden from viewers and only owners can see it.
ADD CONDITIONAL FIELDS
After you’ve added multiple checkout fields, you’re not done with customization. Conditional fields also come into play with an entirely different checkout process. For custom checkout fields and products, this conditional field customization process implies. However, you may restrict your fields depending on your preference.
If you want to gather additional information for any specific product no matter the size, you want this to be done for specific customers. Of course, you add conditional fields for a specific group to whom you want to appear on the checkout page. With this, you allow selected users to provide information you want to see. It provides you full control and access to details our users fill out.
Here are the details you expect from your customers to fill out using conditional field checkout:
Cart Content
Cart Subtotal
Cart Total
User Roles
Product Category
Product Variation
FREEMIUM AND PREMIUM FIELDS
WooCommerce checkout field editor comes with an amazing option at the same time. The choice is not limited, as you can enjoy both free and paid checkout fields to interact with our bespoke customization features. For free users, we have displayed all checkout editor plugins. On the other hand, users can unlock premium plugins to take the checkout process to a new level.
If you want to use free plugins to save money, you may utilize the benefits of fields such as Text, Email, Password, Phone, Textarea, Select, Multi-Select, Checkout, and Radio. These are free fields that anyone can access with ease. On the contrary, premium plugins include a range of fields such as file upload, custom text, checkbox group, date picker, time picker and hidden, etc.
If you compare both, premium checkout fields have more features and are more in demand.
USE ADVANCED CUSTOMIZATION OPTIONS
The game isn’t over once you have overviewed all the free and premium plugins, you may also use advanced customization options such as field name, label, placeholder text, character limit, and width to add more options. Usually, a user prefers to add details and these advanced customization options play a key role.
SHOW OR HIDE CHECKOUT FIELDS
Show and hide checkout fields also work great, as these are the fields that allow you to put restrictions on users at the time of adding and disabling unnecessary fields. So, you always have a chance to hide and disable it. Further, this checkout custom field is interesting, as you can disable and enable it with one single click of ‘hide’ and ‘show’.
ADD OR DELETE CHECKOUT FIELDS
If you want some more experiments and looking forward to adding or deleting checkout fields, then you may try this WooCommerce checkout manager plugin on your checkout page to provide more options to your buyers. It simply works when you press ‘add a new field’ or click ‘remove’ as required.
MARK MANDATORY FIELDS AS REQUIRED
A mandatory checkout field editor also inspires users when they have to go through fields that are required. Hence, users have the chance to mark mandatory fields using this plugin. There is no way to skip the fields, as this mandatory field is specifically designed for users with some meaningful purpose behind it.
DISPLAY THE FIELDS IN EMAILS
If you want to know some more custom fields that have a link with customer emails, then you must use this display the fields in emails to address your customers regarding this option. There is always an option to display the fields for your respective customers in emails to provide them with smooth edit options.
DISPLAY THE FIELDS ON ORDER DETAIL PAGES
‘Order detail page’ is an effective WooCommerce checkout field editor plugin that supports users who want to see more specifications and product details. Thankfully, they happen to see this terrific checkout editor plugin that eases their work and comes across details with one single click. Using this plugin, customers may add contact details and provide the necessary information required.
REPOSITION THE REQUIRED FIELDS
The option of repositioning has a good impact on the checkout page. The option of repositioning is always a special process and a kind of gift for users who want to swap one field for another. Hence, users can easily drag the fields to change their order and that’s an interesting customization process that implies on a checkout page.
RESET THE DEFAULT SETTINGS
The option of resetting the default settings facilitates users when they have the desire to make some tricky changes that require a resetting feature to take this action. By clicking on the ‘reset to default fields’ button, you may easily reset the default settings to overcome the mistakes and wrong actions. Indeed, this WooCommerce checkout field editor works great!
QUICKLY SAVE REQUIRED CHANGES
If you want to make friendly changes to your WooCommerce checkout manager just to improve the functionality, you must use this checkout field editor to add and edit advanced custom fields in no time. With this editor field, you probably find massive improvements in the WooCommerce checkout page with accuracy.
If you have any questions about our plugin and don’t know how to use it, feel free to Contact Us
Screenshots

Plugin Setting for add new custom field 
How to add dropdown field using Custom Fields WooCommerce Checkout Page 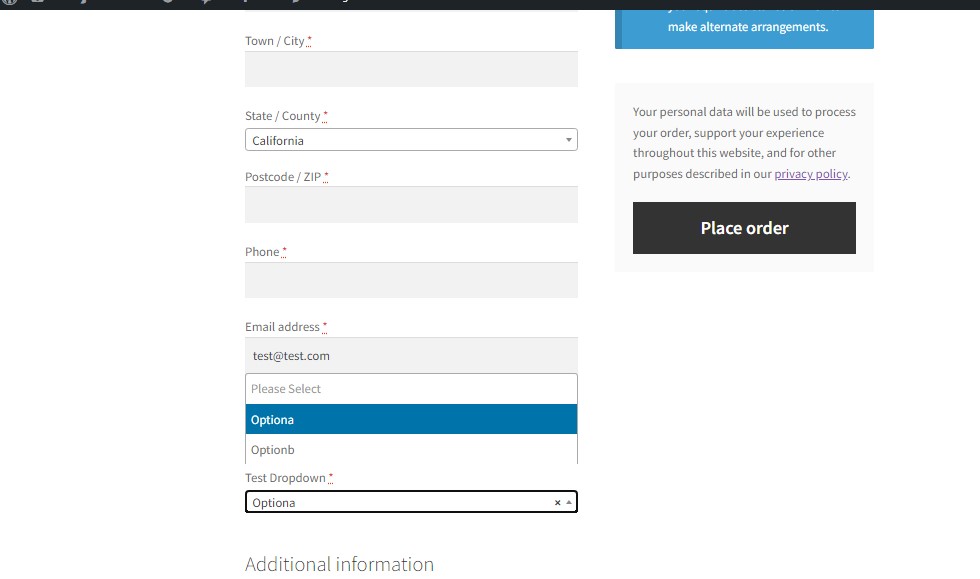
How your fields will look on front end
Installation
You can install this plugin like any other WordPress plugin.
- Download and unzip the latest release zip file.
- Upload the entire plugin directory to your /wp-content/plugins/ directory.
- Activate the plugin through the Plugins menu in WordPress Administration.
- Go to Dashboard:-> WooCommerce -> Checkout & Register Editor
FAQ
-
Can I add custom field sections?
-
Yes, but you will have to purchase Custom Fields WooCommerce Checkout Page PRO.
-
I have installed the plugin but I do not know where the plugin settings are
-
The plugin is available in the WordPress menu in the WooCommerce > Checkout & Register Editor.
-
Is this plugin have multilingual support ?
-
Yes its support multilingual you can translate strings of Custom Fields WooCommerce Checkout Page using any WordPress language plugins
-
How Can I add fixed price to woocommerce checkout?
-
- go to WooCommerce -> Checkout & Register Editor
2 Click Add New field add fixed price or add percentage on cart based you want to add in checkout total.
- go to WooCommerce -> Checkout & Register Editor
Reviews
Contributors & Developers
“WooCommerce Checkout Field Editor (Checkout Manager)” is open source software. The following people have contributed to this plugin.
Contributors“WooCommerce Checkout Field Editor (Checkout Manager)” has been translated into 7 locales. Thank you to the translators for their contributions.
Translate “WooCommerce Checkout Field Editor (Checkout Manager)” into your language.
Interested in development?
Browse the code, check out the SVN repository, or subscribe to the development log by RSS.